
Section: A (Create first Virtual Machine)
1. Create the windows folders to house the first virtual machines and the shared storage.
F:\>mkdir RAC1
F:\>mkdir SHARED-STORAGE
2. Open VMWARE Console and Click on New Virtual Machine and click next.
3. Select Virtual Machine Configurations: Custom

4. Choose Vm Machine Compatibility


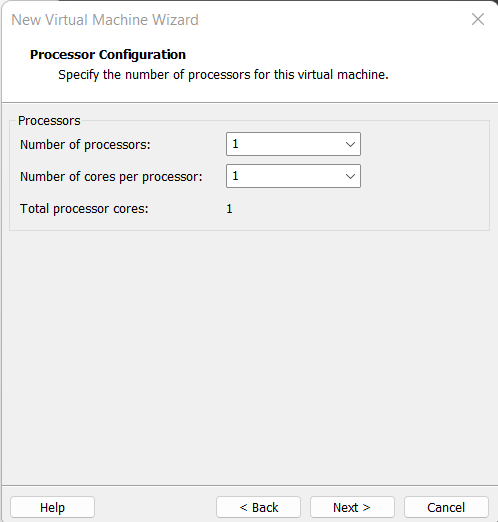


Click on the Finish button.
Now your virtual machine is ready to install Solaris 10 OS
Section: B (Install Solaris 10 OS on first Virtual Machine)
1. Double Click on CD-ROM Devices. Select Use ISO image when you planning to install OS through ISO image otherwise Use physical drive.
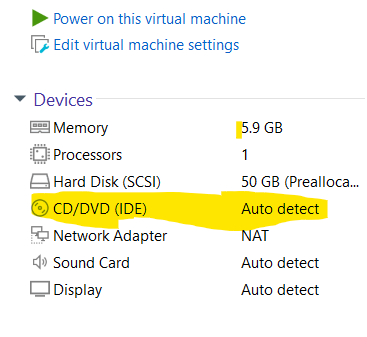

2. Click on Start the Virtual Machine.
3. Select Solaris Interactive (Default) installation
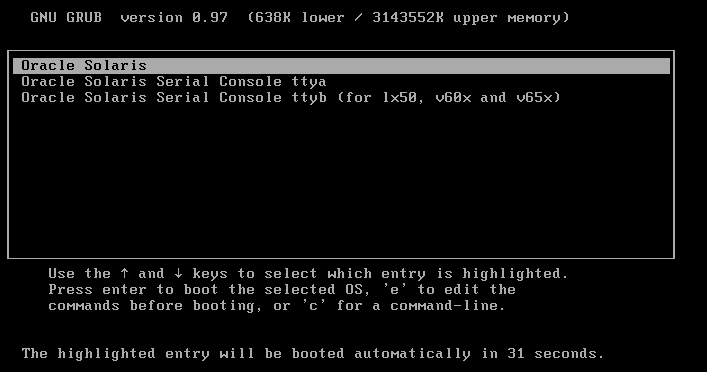
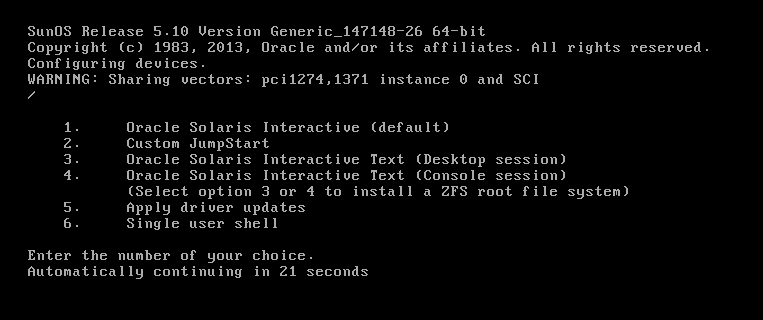
press 1
4. Configure keyboard Layout screen appear (press F2)
5 Select a language English
6 welcome screens appear (Click Next)
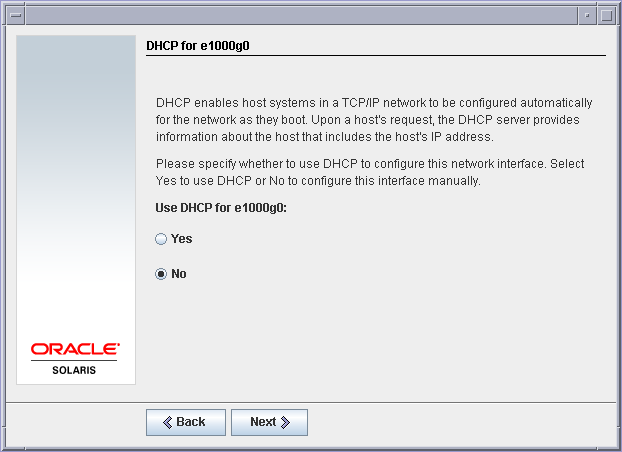
7 Select network connectivity and (Click Next).

8. DHCP Screen appears select No and (Click Next)
9. Type Host Nome and (Click Next) ------racnode1

10. Type IP Address and (Click Next) ------192.168.0.111

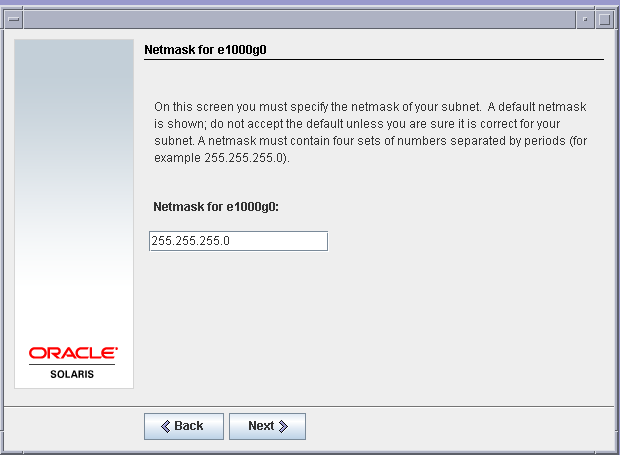
11. Type NETMASK (Select default) and (Click Next)
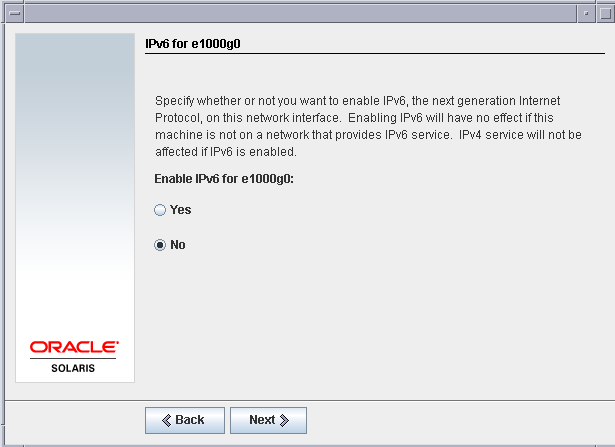
12. Select No for Enable Ipv6 for pcn0 and (Click Next)
13. Select None for Default Route and (Click Next)

14. Select No for Enable Kerberos security and (Click Next)

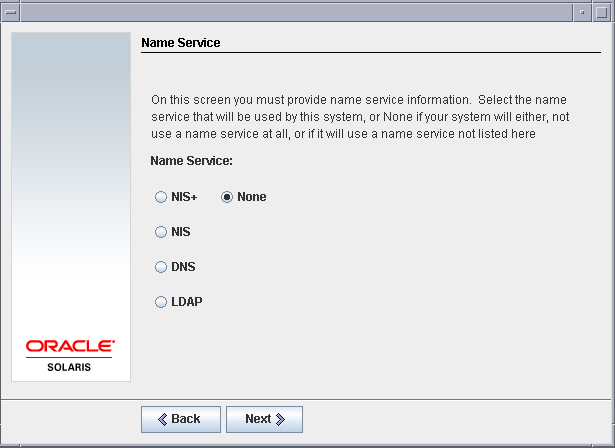
15. Select None for Name Services and (Click Next)
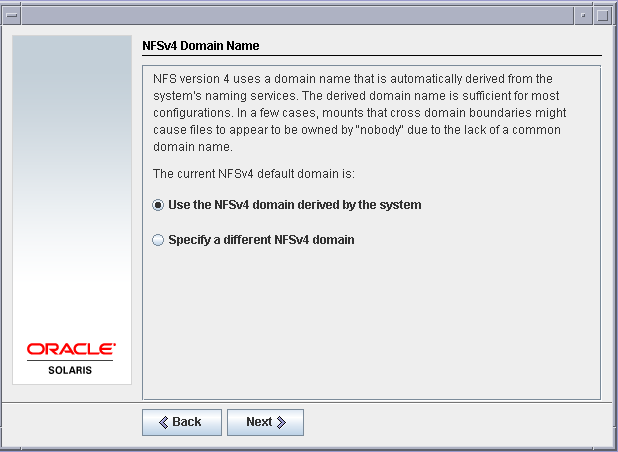
16. NFSv4 Domain Name select Default and (Click Next)
17. Select Geographic Time Zones and (Click Next)

18. Continent and Country (INDIA) and (Click Next)

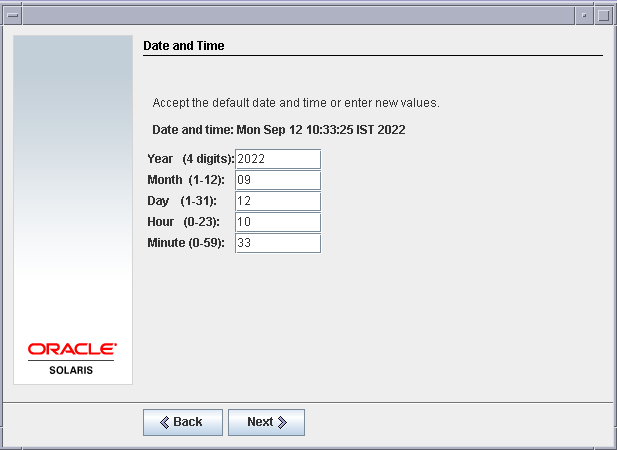
19. Accept the default date and time and (Click Next)
20. Enter ROOT password and (Click Next)

21. Select Yes for Enabling Remote Services and (Click Next)

22. Confirm Information and (Click Next)

23 Select Custom Install option and (Click Next)


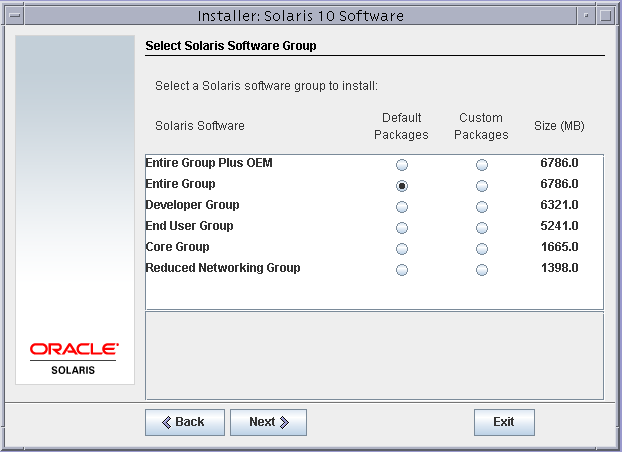


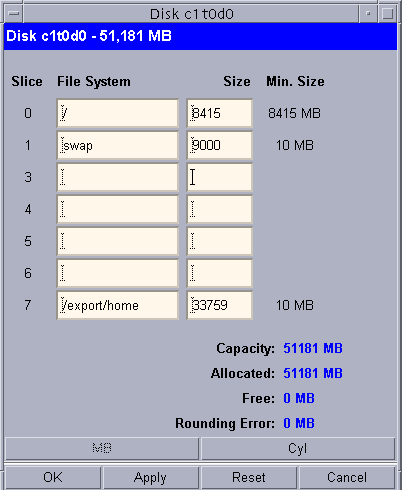
Adjust Swap space .
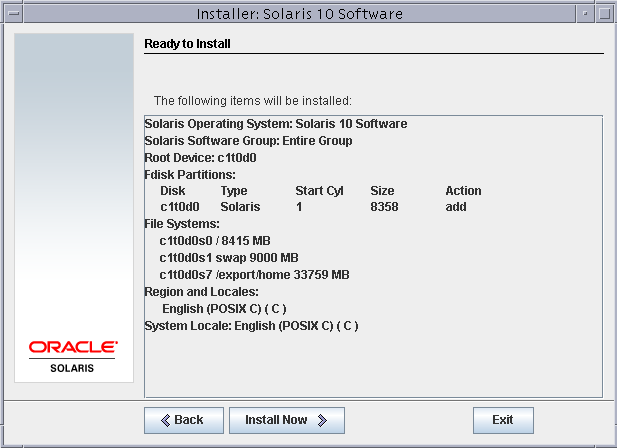
After that the system is being analyzed. Please wait for the screen to appear and select the Type of Installation. Now Installer Install the OS…
Section: C (Create Shared Storage and Configure)
►Create virtual disks for storage usage, which is shared by Both Machine
1. down the virtual Machine (RAC1)
2. Go to VMware Server Console. Click on Edit virtual machine settings.
Virtual Machine Settings: Click on Add.
Add Hardware Wizard: Click on Next.
Hardware types: Select Hard Disk.
Select a Disk:
Disk: Select create a new virtual disk.
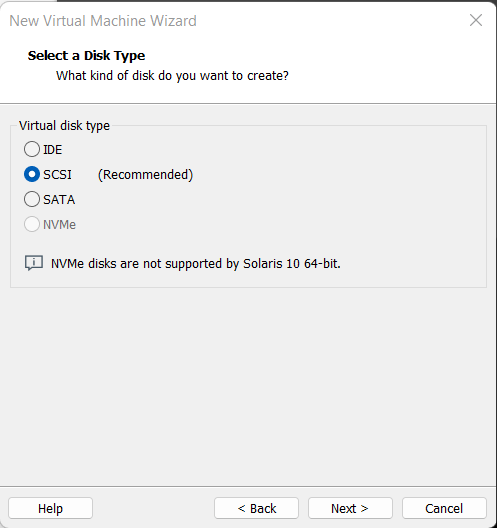
Select a Disk Type:
Virtual Disk Type: Select IDE (Recommended).
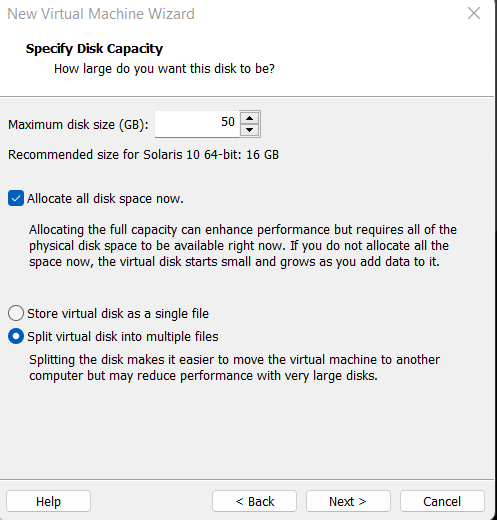
Specify Disk Capacity:
Disk capacity: Enter “10GB.”
Select Allocate all disk space now.
Specify Disk File:
Disk file: Enter “F :\> SHARED-STORAGE\DISK1.vmdk.”
Click on Advanced
Add Hardware Wizard:
Virtual device node: Select IDE0.1.
Mode: Select Independent, Persistent for all shared disks.
3. Click on Finish.
► Modify virtual machine configuration file.
Additional parameters are required to enable disk sharing between the two virtual RAC nodes. Open the configuration file, F:\>SUNOS-1\ Solaris 10.vmx.vmx and add the bold parameters listed below.
.
.
.
priority.grabbed = "normal"
priority.ungrabbed = "normal"
disk.locking = "FALSE"
diskLib.dataCacheMaxSize = "0"
ide0:1.sharedBus = "virtual"
ide0:0.redo = ""
ethernet0.addressType = "generated
-
-
-
-
-
ethernet0.connectionType = "hostonly"
ide0:1.present = "TRUE"
ide0:1.fileName = "E:\SHARED-DISK.vmdk"
ide0:1.redo = ""
checkpoint.vmState = ""
ide0:1.mode = "independent-persistent"
ide0:1.deviceType= "disk"
floppy0.present = "FALSE"
Section: D (Enable root login over SSH)
Enable root login over SSH on both machine
vi /etc/ssh/sshd_config
Add a line in the Authentication section PermitRootLogin yes
Reboot the RACNODE 1 Machine
Section : E (Setup domain name)
Create or edit a file called /etc/defaultdomain and add the single entry: On both Node
$vi /etc/defaultdomain
indiandba.com
Execute the domainname command to set the domain as follows:
$domainname ‘cat /etc/defaultdomain’
Section: F (Create and Configure the Second Virtual Machine)
1. Create the windows folders to house the second virtual machines.
E:\>mkdir RAC2
2. Shutdown the First Virtual Machine
3. Copy all the files from F:\RAC1 to E:\RAC2
4. Open VMware Server Console, press CTRL-O to open the second virtual machine, E:\RAC2\Solaris 10.vmx.
5. Rename the second virtual machine name from RAC1 to RAC2.
Click on Start this virtual machine to start RAC2, leaving RAC1 powered off.
RAC2 – Virtual Machine: Select create a new identifier.
6. Log in as the root user and modify the network configuration.
Follow below step for modifying Host Name and IP
$ ifconfig <Ethernat> <new IP> (eg: $ifconfig pcn0 192.168.157.222)
$ ifconfig <Ethernet> up (eg: $ifconfig pcn0 up)
$ go to /etc/hosts file and change IP and host (eg 192.168.157.222 rac2 racnode2)
$ go to /etc/nodenames file and change host name (eg: RAC2)
$ go to /etc/hostname.<Ethernet> (eg: /etc/hostname.pcn0) and change host name (eg: RAC2)
7. Restart the Second Virtual Machine.
8. Start the First virtual Machine
9. Verify all changes and Enjoy.
Section: E (Add EtherNet Adapter for Private Network in Both Machine)
1. Put the following entry in /etc/hosts file on Both Node.
192.168.157.111 racnode1.indiandba.com racnode1
192.168.157.222 racnode2.indiandba.com racnode2
192.168.157.11 racnode1-priv.indiandba.com racnode1-priv
192.168.157.22 racnode2-priv.indiandba.com racnode2-priv
192.168.157.50 racnode1-vip.indiandba.com racnode1-vip
192.168.157.60 racnode2-vip.indiandba.com racnode2-vip
2. Power off both machines
(Note: Complete step 3 to 8 on both node one by one)
3. Click on Edit virtual machine setting
4. Click Add button and select Ethernet Adapter
5. Select Host-Only Network type
6. Start the Both Machine and check network settings on both machines.
7. Go to RAC1 node: (Plumb Ethernet)
$ifconfig pcn1 plumb 192.168.0.11 netmask 255.255.255.0
$ifconfig pcn1 up
$ go to /etc/hostname.pcn1 and change host name (eg: rac1-priv)
$ifconfig –a (This will show all Ethernet Adapter)
8. Go to RAC2 node: (Plumb Ethernet)
$ifconfig pcn1 plumb 192.168.0.22 netmask 255.255.255.0
$ifconfig pcn1 up
$ go to /etc/hostname.pcn1 and change host name (eg: rac2-priv)
$ifconfig –a (This will show all Ethernet Adapter)
9. Power on both machine and verify your network setting
Section F (Create Oracle User and Group)
Step 1 Create Oracle Users and Group (in all Nodes)
Log in as a root and execute:
# groupadd oinstall
# groupadd dba
# mkdir -p /export/home/oracle
# useradd -d /export/home/oracle -g oinstall -G dba oracle
# chown oracle:dba /export/home/oracle
# passwd oracle
New Password:
Re-enter new Password:
passwd: password successfully changed for oracle
Section: G (Prepare Disk for OCR, Voting and ASM Storage)
1. Run below mention command on both node
$devfsadm
2. Log on to RAC1 node and complete bellow mention procedure.
Here we will create following partition:
c0d1s0 for OCR Disk
c0d1s1 for Voting Disk
c0s1s3 form ASM Disk
c0s1s4 from ASM Disk
c0s1s5 from ASM Disk
3. Complete bellow mention steps for creating partition
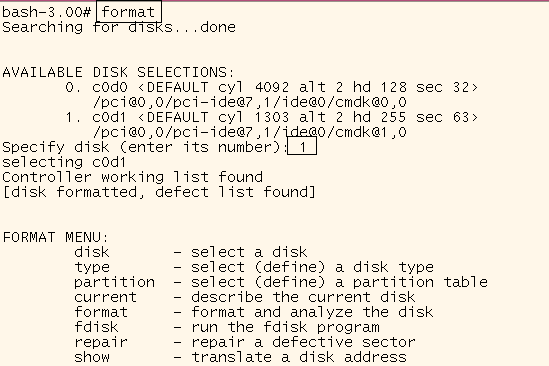
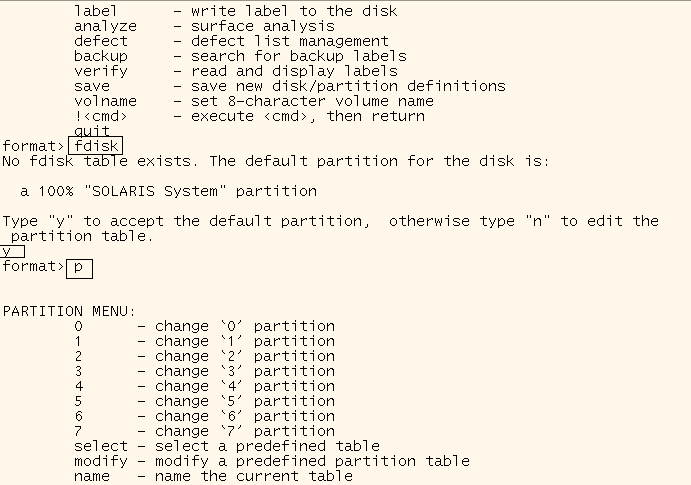
$format


4. Set ownership of Disk (Note: This will be done after creating Oracle user and dba group)
Default owner is root:sys needs to be changed to oracle:dba .We need to set oracle:dba ( here oracle is a Oracle owner and dba is a group) ownership of the disk.
Check ownership of Disk. Execute following command for all slice as a root user.
Example:
$ ls -lhL /dev/rdsk/c0d1s0
crw-r----- 1 root sys 118, 64 Feb 16 02:10 /dev/rdsk/c0d1s0
$ chown oracle:dba /dev/rdsk/c0d1s0
Post a Comment